Position open-loop control
This control loop allows you to move your motor to the desired angle in real time without using the position sensor. This mode is enabled by:
// set position motion control open-loop
motor.controller = MotionControlType::angle_openloop;
You can test this algorithm by running the examples in the motion_control/open_loop_motor_control/ folder.
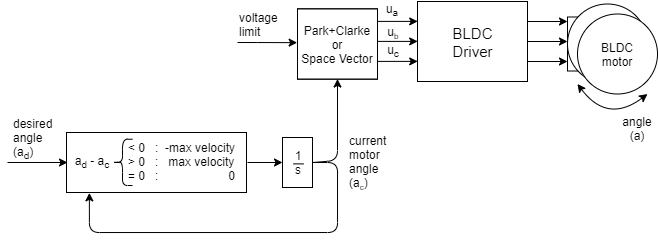
This control algorithm is very simple. User sets the target angle it wants to achieve ad. The algorithm only subtracts the current angle ac and the desired angle ad to find the direction it needs to move and goes in that direction with the highest velocity possible motor.velocity_limit(max velocity). To set this velocity it uses the same algorithm as for velocity open-loop control. It integrates the velocity it in time to find out what is the angle it needs to set to the motor ac in order to achieve it. Then the maximal allowed voltage motor.voltage_limit is going to be applied in the direction of the ac using SinePWM or SpaceVector modulation.
Configuration
// choose FOC modulation (optional)
motor.foc_modulation = FOCModulationType::SpaceVectorPWM;

//  maximal velocity of the position control
// default 20
motor.velocity_limit = 20;

// limiting voltage
motor.voltage_limit = 3;   // Volts
// or current  - if phase resistance provided
motor.current_limit = 0.5 // Amps
This type of motion control is highly inefficient therefore try not to use to high value for motor.voltage_limit. We suggest you to provide the motor class with the phase_resistance value and set the motor.current_limit instead the voltage limit. This current might be surpassed but at least you will know an approximate current your motor is drawing. You can calculate the current the motor is going to be producing by checking the motor resistance phase_resistance and evaluating:
voltage_limit = current_limit * phase_resistance; // Amps
The maximal velocity motor.velocity_limit value is going to determine how fast your motor goes in between positions. The higher the value the faster the transition. But since we are turning the motor in open-loop we will not be able to know if the motor can follow the velocity. So make sure to put the velocity_limit value that is achievable for your motor. Also beware that for higher velocities and more holding torque you will need to increase the motor.voltage_limit or motor.current_limit variable as well.
Also, you can change the voltage limit motor.voltage_limit (motor.current_limit) and transition velocity motor.velocity_limit in real-time if you need this kind of behavior in your application.
Position open-loop control example
Here is one basic example of the velocity open-loop control with the complete configuration. The program will set the target position of 0 RAD and maintain it, and the user can change the target position using serial terminal.
// Open loop motor control example
#include <SimpleFOC.h>

// BLDC motor & driver instance
BLDCMotor motor = BLDCMotor(11);
BLDCDriver3PWM driver = BLDCDriver3PWM(9, 5, 6, 8);

//target variable
float target_position = 0;

// instantiate the commander
Commander command = Commander(Serial);
void doTarget(char* cmd) { command.variable(&target_position, cmd); }

void setup() {

  // driver config
  // power supply voltage [V]
  driver.voltage_power_supply = 12;
  driver.init();
  // link the motor and the driver
  motor.linkDriver(&driver);

  // limiting motor movements
  motor.voltage_limit = 3;   // [V]
  motor.velocity_limit = 5; // [rad/s] cca 50rpm
  // open loop control config
  motor.controller = MotionControlType::angle_openloop;

  // init motor hardware
  motor.init();

  // add target command T
  command.add('T', doTarget, "target angle");

  Serial.begin(115200);
  Serial.println("Motor ready!");
  Serial.println("Set target position [rad]");
  _delay(1000);
}

void loop() {
  // open  loop angle movements
  // using motor.voltage_limit and motor.velocity_limit
  motor.move(target_position);

  // user communication
  command.run();
}